
How to Shuck an Oyster
 Oysters are a delicious hors d’oeuvre or entrée. They are best raw with a squeeze of lemon juice or splash of tobacco. If you want to enjoy raw oysters at home, it is time to learn how to shuck an oyster. Shucking oysters is easy once you get the hang of it.
Shopping and Storing Oysters
When you pick up oysters from your local seafood market or grocery store, be sure that the shells are clamped shut instead of open. The oysters should be alive. If the shells are open or broken, it means that the oysters are dead and should not be eaten. You should also avoid oysters with a strong, fishy smell. Good fresh oysters will have a salty smell like a sea breeze.
Fresh live oysters should be stored on ice in an open container covered by a damp cloth. Do not cover them in saran wrap or with a lid since this will suffocate them. They can be stored in the back of a refrigerator for up to a week but are best served the same day.
Preparing Oysters to Shuck
Before you start shucking the oysters, run cold water over them and thoroughly scrub them to remove any mud, sand and dirt on them. It is important not to skip this step unless you don’t mind getting a mouthful of sand.
Prepare your workspace by grabbing a short knife (preferably an oyster knife though a table knife with a thin edge will also work), a tea towel and a garbage bin or large bowl for the discarded shells. Then cover a platter or rimmed baking sheet with a layer of coarse salt or ice if you are planning to half shell them. If you want to completely remove the shells, fill a bowl with ice and sprinkle with salt.
Once the oysters are clean and you have all your supplies, you are ready to get started!
 Step-by-Step Oyster Shucking Instructions
Step 1 – Pick up the oyster with the tea towel
Use the tea towel to pick up the oyster and cover all but the hinge. This will help you keep your grip on it and protect your hand from the knife. The belly side (or rounded side) should be on the bottom and the flat side should be on top since you want to remove the flat top.
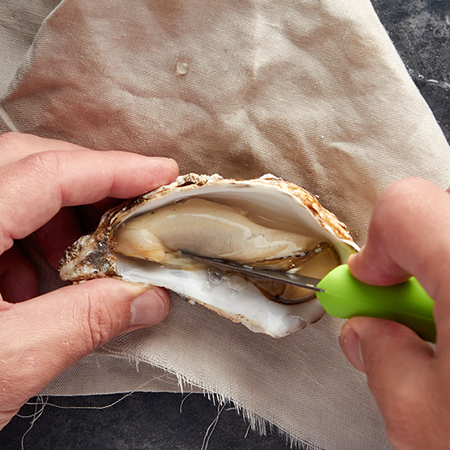
Step 2 – Slip the knife tip through the hinge
Slide the tip of the knife along the edge of the hinge until you find an opening. Once you find an opening, gently push the knife through it and leverage it into the shell.
Step 3 – Pop open the hinge
Twist the knife, once it is through the opening, to make the hinge pop open.
Step 4 – Slide the blade across the shell and remove the top shell
Once the hinge is open, slide the blade through the shell to cut any muscle attachments holding the shell together. Then you can pull the flat top shell off and discard it.
Step 5 – Inspect the oyster
Look at the oyster now that the top shell is gone. It should look juicy and translucent. If it smells or looks dried out, throw it out! If it looks good but you notice a teeny-tiny crab or dark, muddy spots, use the knife to gently remove them.
Step 6 – Cut the oyster free
Run the blade along the bottom of the shell to cut it free so that the oyster will easily slide into your mouth or into a bowl. If you’re planning to enjoy your oysters in the half shell, set your shucked oyster down on the platter or baking sheet. If you want the enjoy the oyster shell-free, tip the shell into the ice filled bowl and let the oyster and its juices slide out.
Step 7 – Repeat. Then enjoy!
Repeat these steps for all the oysters. Once you are done, serve them with the sauce and sides of your choice.
For fresh oysters from the cold waters of Cape Cod, Long Island and the East Coast, stop by City Fish Market!